A blue screen of death is no Christmas. It is rather a headache and the first thing you think off after getting one will probably about getting rid of it. Well, join the club. A lot of users get such a screen due to a lot of different errors. But in this article, the topic of focus will be fixing UNEXPECTED KERNEL MODE TRAP error AKA the 0x0000007F error.
We will be going over different ways in which you can solve this issue. Furthermore, we will go over a couple of its common causes and how exactly the error occurs.
Contents
- 1 What is UNEXPECTED_KERNEL_MODE_TRAP error?
- 2 How To Fix UNEXPECTED KERNEL MODE TRAP Error?
- 2.1 Solution 1: Updating or Disabling faulty Drivers
- 2.2 Solution 2: Running System File Checker
- 2.3 Solution 3: Running Memory Diagnostics
- 2.4 Solution 4: Checking for Windows Update
- 2.5 Solution 5: Troubleshooting for Hardware Failures
- 2.6 Solution 6: Disabling memory cache from BIOS
- 2.7 Solution 7: Cleaning up your computer
What is UNEXPECTED_KERNEL_MODE_TRAP error?
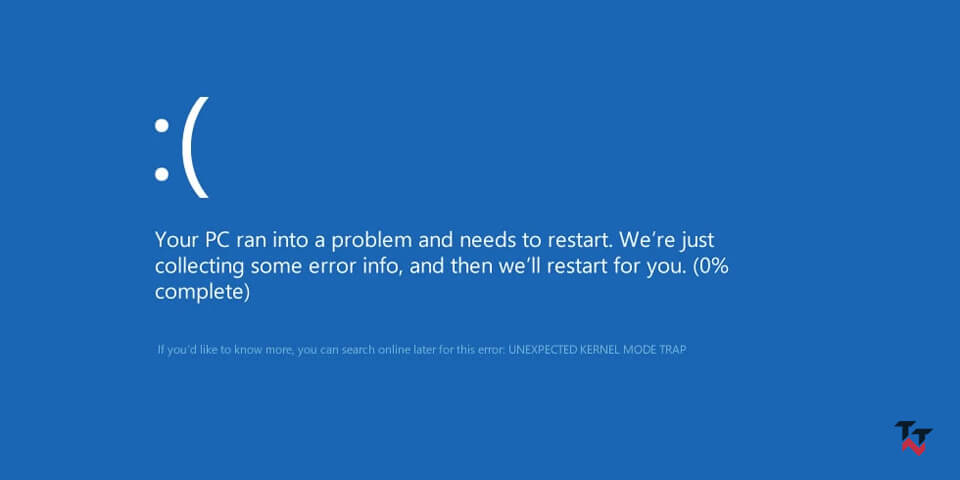
Error message:
🙁
Your PC ran into a problem and needs to restart. We’re just collecting some error info, and then we’ll restart for you.
If you’d like to know more, you can search online later for this error: UNEXPECTED KERNEL MODE TRAP
As mentioned above, the error comes about and turns your screen blue. The error happens either when the CPU creates a situation that is not meant for the kernel or when it creates an unrecoverable error.
Causes of the blue screen error
In most cases, the error occurs because of hardware failures. And these are mostly due to memory issues. Although there are a fair amount of cases that happen because of software issues as well.
Speaking of memory issues, the first thing that comes to mind is a faulty RAM module. It can often cause read and write errors in your system. While on the software side, faulty drivers can often cause issues. They might be corrupted or updated.
How To Fix UNEXPECTED KERNEL MODE TRAP Error?
Now, we are covering the part that you have been waiting for. Here, we have listed a total of 7 solutions to fix UNEXPECTED_KERNEL_MODE_TRAP error in Windows 10.
Solution 1: Updating or Disabling faulty Drivers
Most errors can be traced back to some kind of faulty functioning of one of the drivers. Therefore it is sensible to tinker with these for a while till your problem gets fixed.
- Go to the Windows search bar.
- Type in devmgmt.msc and then hit Enter.
- Open Device Manager from the search results.
- Search for your driver among the long list that appears in the new Window.
- After locating your driver, right-click on it.
- Now you can update your driver using the Update Driver Software option.
- Similarly, choose the Disable option to disable that driver or the Uninstall option to uninstall the driver.

If you don’t want to go through the hassle of updating your drivers manually, you can always let your computer take care of it by itself.
- Place the cursor on the Windows search bar.
- Type in Control Panel and then hit Enter.
- From the various options available on the screen, choose the Hardware and Sound option (If view by Category is selected. Otherwise skip this step).
- Once you reach that screen go for the Devices and Printers option which will probably be at the top of the screen.
- You will be able to see various devices connected to your computers and your computer in the first spot.
- Right-click on it and then select Device Installation Settings from the options.
- Click on the Yes, do this automatically option and then opt for the Save Changes button at the bottom of the screen.
- Now you will have to follow several on-screen instructions, but you will be done with them in no time.
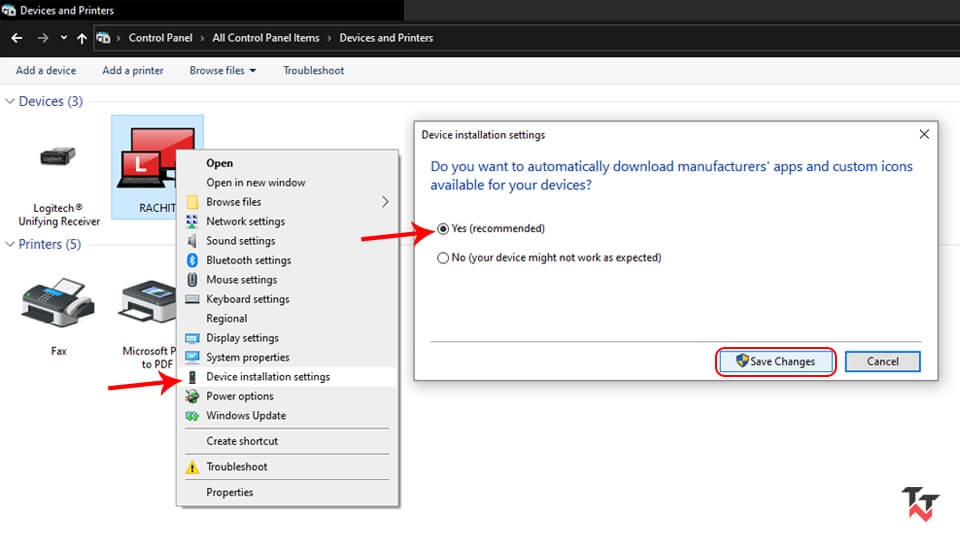
Now, check if unexpected kernel mode trap windows 10 error solved or not.
Solution 2: Running System File Checker
There are a lot of blue screen errors that can happen when we are talking about windows. And the error in question is one of them too. One common cause of these errors may be corrupted or missing system files. Hence there is a need for repairing these files.
We scan and repair these files using the SFC scan.
- Type in Run in the windows search bar and then press Enter. Otherwise just go for the combination, Windows key + R key, on your keyboard to open the Run dialogue box.
- Once the Run dialogue opens, you need to use it to open the Command Prompt as an administrator. For that, type in cmd and then press Ctrl + Shift + Enter.
- Press Yes if you are asked for permission.
- Type sfc /scannow command and press Enter. (Do note that the space between ‘c’ and ‘/’ is necessary. The command won’t run otherwise.)
- Wait till the verification reaches 100% completion and you are good to go.
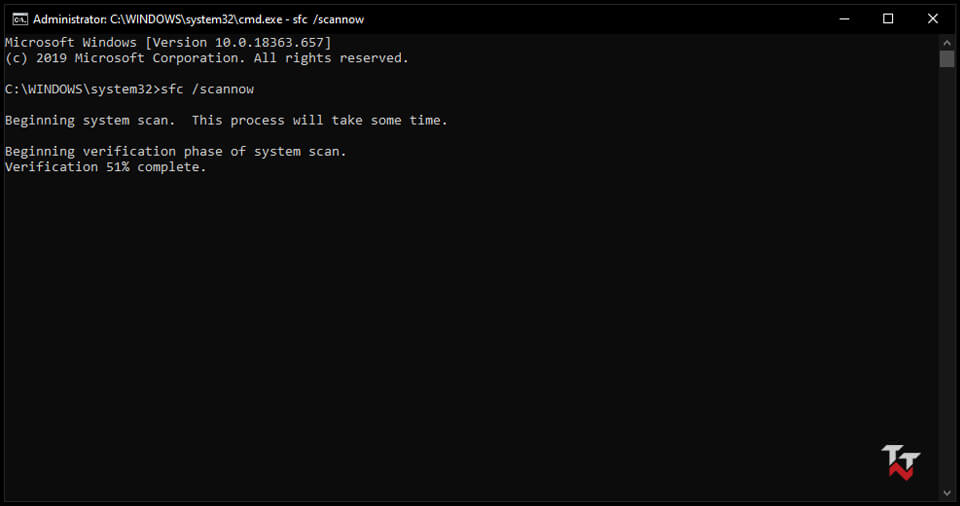
This solution should work and you can do any task on your PC without any fear. If not then check out other methods.
Solution 3: Running Memory Diagnostics
Sometimes the glitch in your system may be caused by faulty memory. Hence to get rid of the blue screen you need to come up with a way to fix your computer’s memory issues. For this purpose, you can use the Memory diagnostic. Running a memory diagnostic will fix any issues related to the corruption of memory.
- Go to the Windows search bar and type in Run.
- Open the Run app from the results. (Alternatively, you can use the combination Windows key + R key to open the Run dialogue box.)
- Type in mdsched.exe in the space provided and then go for the OK option or hit Enter.
- In the prompt window, you will get two options. Choosing the first one, the Restart now and check for problems(recommended) option, will begin the process right then. While choosing the second one, the Check for problems the next time I start my computer option, will begin the diagnostic the next time you switch on your computer.
- It is probably a better idea to choose the former. Doing so will initiate the process and you have to wait till it completes.
- Restart your computer once you are done.
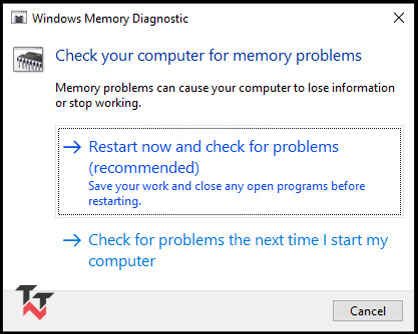
This is an efficient solution to the unexpected_kernel_mode_trap error. Therefore, it is possible that you will no longer see a blue screen error.
Solution 4: Checking for Windows Update
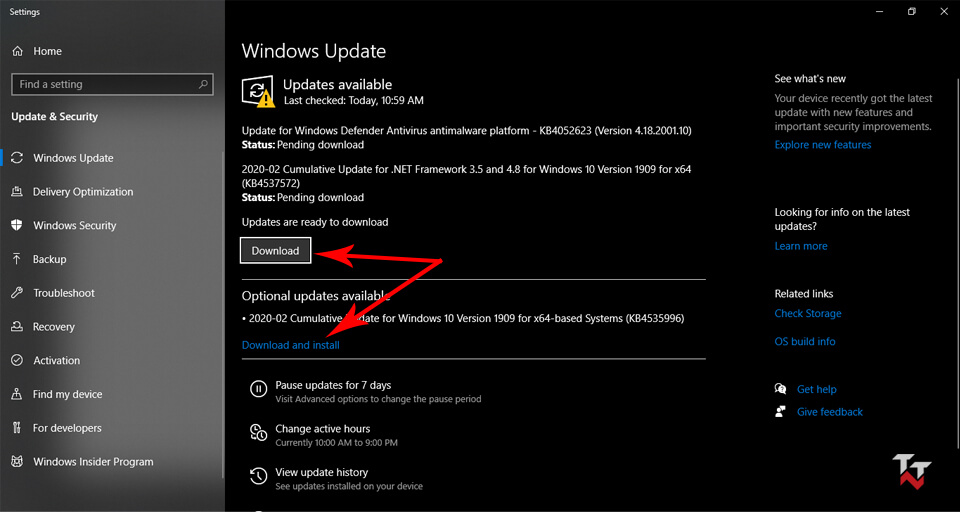
Over time your version of windows will wind up having some bugs and security flaws of both hardware and software origin. To fix your error or not, it is very wise to get your Windows back to the state it was. And the best way to do that is to update it.
- Use the Windows search bar to look for Windows Update.
- The results will show an option called Check for updates. Go forward with it.
- You can also reach this window by opening your Settings and then choosing the Update & Security option.
- Regardless of how you got there, go for the Check for updates option.
- If an update is available begin the installation process and follow the on-screen instructions to complete it.
When was the last time this error occurred, what were you doing on the PC? Do the same task and check whether unexpected kernel mode trap windows 10 problem solved or not.
Solution 5: Troubleshooting for Hardware Failures
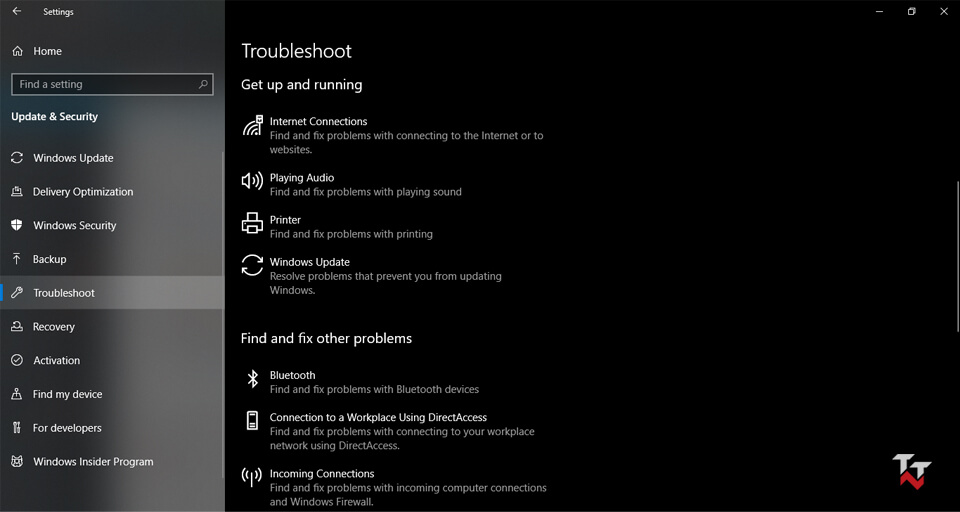
A lot of errors arise due to hardware incompatibility and Unexpected Kernel Mode Trap is no stranger to this cause. So to find and fix problems related to the incompatibility of hardware, you should run a Hardware and Device troubleshooter.
- Open the start menu by clicking on the Windows icon and click on Settings.
- Among the various options on the screen, select the Update & Security option.
- Choose the Troubleshoot option next.
- Get your attention to the right panel. You will see lots of options there.
- Click the appropriate option according to the error 0x0000007F.
- After you are done with it choose the Run the troubleshooter option.
- It will automatically detect and solve the problem.
Does it work? If yes, you should thank us by sharing this article with your friends.
Solution 6: Disabling memory cache from BIOS
BIOS stands for basic input and output system and your microprocessors use it to make sure that your computer functions as needed. Clearing up its cache may sometime fix the error.
- Restart your system.
- Enter the BIOS Setup by pressing the F2 key or Del key.
- Choose the Advanced menu.
- After that proceed to choose the Cache Memory option.
- Check if the option is disabled.
- Save & Exit once you are done with the help of the F10 key.
- Click Yes to confirm your choice.
Solution 7: Cleaning up your computer
If you are really down on your luck then the UNEXPECTED KERNEL MODE TRAP error may get fixed if you attempt to clear its inside off dust and debris. As you realize, the insides of a computer are pretty sensitive and unclean conditions can easily ruin it.
First of all, shut down your computer and then unplug it from power. After that, disconnect the devices from your PC. Check out the PCI components and clean them if they are covered in dust. Reconnect all the parts after you are done. Once you have plugged in power, switch on the computer and check for the BSOD error.
Conclusion
The article begins with a brief definition of the UNEXPECTED_KERNEL_MODE_TRAP error and the ways in which it comes about. Then it dives into the causes of the error and the ways in which you can fix the issue. Now that you have read this article, you can apply the methods in it to get rid of that blue screen of death error.
