Since its launch in 2008, Google Chrome has earned a reputation as one of the most dependable web browsers. However, a few errors, such as “err connection closed,” have compelled users to search for solutions across the internet.
If you are one of those users still searching for a solution, you have come to the right place. We have compiled a list of all possible causes of this error, along with a step-by-step guide to help you resolve it easily and permanently. Let’s get started!
Contents
What is the Err Connection Closed Error?
The error pops up when the server of the website from which you are requesting the data is rejecting your request for the data. Thus the server is not providing the computer with the necessary data to access the website.
A message may be displayed as follows:
- The Webpage is not available.
- This site can’t be reached.
- ERR_CONNECTION_CLOSED
To resolve this issue, it is essential to identify the root cause. The “err_connection_closed” error is primarily caused by network issues, but problems with Chrome or other bugs could also play a role in triggering this error.
The main reasons for this error are:
- Outdated DNS Cache
- Obsolete cache and data
- Incompatible DNS settings in Window
Fix Err Connection Closed Error
Well, this error is not limited to only the Windows operating system. Err connection closed Mac is also reported by Apple users as well. We have covered all possible solutions to address this error, depending on the various causes it may have, allowing users to get to the root of the problem.
Clearing cookies and cache can be helpful in resolving this problem. Corrupted stored data can lead to various errors, including the one of our interest. However, the process of clearing cache differs for each browser. In this article, we will focus on clearing cache specifically for Google Chrome.
Google Chrome
- Launch Google Chrome.
- Click on the three vertical dots symbol in the top right corner.
- Tap on the More Tools option and select the Clear browsing data option. This can be achieved via Ctrl+Shift+Delete as well.
- You can choose a time frame to delete the data. If, you want to get rid of everything choose All Time.
- Tick the boxes adjacent to the cookies and cache option.
- Finally, click on the clear data option.

If you are using a web browser other than Chrome, here’s how you can clear cache in different browsers.
Solution 2: Changing the DNS settings
Occasionally, the DNS server might fail to respond to your request, causing issues. In such cases, it is recommended to change the DNS server to ensure a smooth connection.
- First, you need to right-click on Windows Logo and choose the Network Connections option.
- Next, you should select the Internet Connection that is currently being used and choose the properties option.
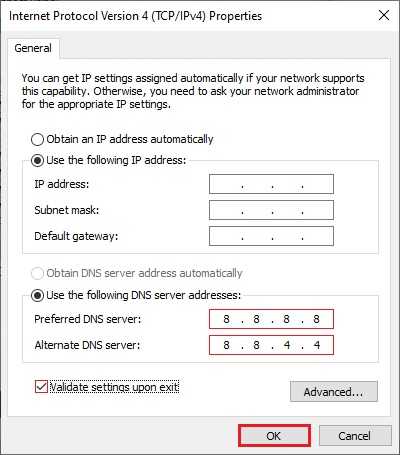
- Out of the list of options available, locate and select Internet Protocol Version 4 (TCP/IPv4) and then tap on the Properties button situated at the bottom right section.
- A new window will open. Tick the Use below preferred and alternate DNS addresses option and then enter the given DNS settings in it. In the Preferred DNS Server type 8.8.8.8 and for the Alternate DNS Server use 8.8.4.4.
- Finally, click the OK button to save the changes.

Solution 3: Disable the proxy
Using a proxy and other VPN software can potentially lead to unwanted problems. Therefore, we strongly advise against using them to avoid any potential issues with your network connection and browsing experience.
- Press the Windows Key and R keys simultaneously and then type “inetcpl.cpl” and press the enter key to open Internet Properties.
- Visit the Connections tab and then choose LAN settings.
- Deselect the “Use a Proxy Server for your LAN” and confirm that the “Automatically detect settings” option is enabled.
- Finally, click the OK button to save the changes and restart your PC.

Solution 4: Reset the default chrome settings
Making changes to Google Chrome settings can sometimes result in problems and errors. If you encounter issues due to altered settings, the best course of action is to reset the settings to their default state. This can help resolve any unexpected problems and ensure a smoother browsing experience.
- In the address bar of the web browser enter the following URL: chrome://flags/.
- Click on the enter button and it will load up a page with the Settings in the browser.
- From the right-hand section of the settings page tap on the “Reset all to default” option and finally restart the browser.

Solution 5: Resetting the network settings
The “err connection closed” error can be caused by misconfigurations in network settings. In such cases, a good solution is to flush the DNS settings. This process can help resolve the error and restore proper network connectivity.
- Tap on the Windows button and in the search bar, enter cmd and click on it. Command Prompt will be opened. (Run it as an administrator).
- To open the Command Prompt screen, follow these steps. First, open the Start menu and search for “Command Prompt.” Once the Command Prompt app appears in the search results, click on it to open the Command Prompt window. After the Command Prompt window opens, you can enter the following commands one by one:
- ipconfig /release
- ipconfig /all
- ipconfig /flushdns
- ipconfig /renew
- netsh int ip set dns
- netsh Winsock reset
Once you have successfully executed all the commands in the Command Prompt, make sure to restart your PC. Restarting your computer will apply the changes and help ensure that the network settings take effect.
Wrapping up,
ERR_CONNECTION_CLOSED is really an annoying issue that interrupts our daily work routine. The solutions to fix this frustrating error may vary, with some requiring a simple tweak and others taking more time.
