Hi Guys, nowadays all of the users manage It’s servers using some third party application,websites and more features which are available on the internet to configure an own private server. this is same things happen to do when you install or configure your server using Like putty or BitWise SSH Client but there is every time need to use a command to do the particular task on servers. Here I show tutorial how to manage servers on server avatar with a single click you install all the things.
Here I share with you How to manage servers using a third-party application ? one of my friend Adarsh Sojitra who made a Website to manage server Easily. So, Now any of the server like DigitalOcean or any other website server when you got then, how to easily manage that Here I put the full tutorial for the managing server without putty or any other applications.
Contents
- 1 How To Manage DigitalOcean Servers With Server Avatar 🙂
- 1.1 How to Connect or Manage DigitalOcean Servers with Server Avatar
- 1.2 How to Point Your Domain with Digital Ocean ?
- 1.3 How to Deploy Server on DigitalOcean ?
- 1.4 How to Add Domain in DigitalOcean ?
- 1.5 How to Connect DigitalOcean with Server Avatar ?
- 1.6 How to Manage, Setting Your Site or Blog With Server Avatar ?
- 1.7 How to Add Site on Server Using Server Avatar ?
- 1.8 How to Install WordPress on Server Using Server Avatar ?
- 1.9 How to Install PhpMyAdmin on Server Using Server Avatar ?
- 1.10 How to Add Database in Server Using Server Avatar ?
- 1.11 Comparison Server Avatar V/s Server Pilot
- 1.12 Server Avatar
- 1.13 Server Pilot
- 1.14 Final Conclusion
Option Available fo Managing Servers :
There is only two option available for Managing Servers nowadays.
- Server Avatar
- Server Pilot
Both sites are better but I personally told you in short Server Pilot is paid and Server Avatar is Free. More you different shows in the features of both in ahead of the post. First I say that Server Avatar is new on the market and getting more and more customer with high ratings and review. The review is important things for all so all of the choose any product using reviews and some kind information related to It.
How To Manage DigitalOcean Servers With Server Avatar 🙂
First, all things to have an own server from any website or particular I recommended to buy DigitalOcean Server it is better than other and Easy to Deploy any Server.
How to Connect or Manage DigitalOcean Servers with Server Avatar
Here I mention one by one steps to configure the server on server avatar. for managing or connecting you do not need any types of skill required. Just GUI Based procedure configure servers in one click.
How to Point Your Domain with Digital Ocean ?
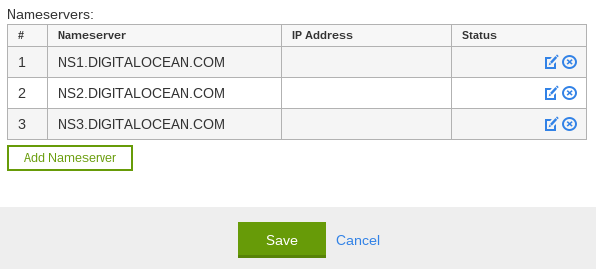
when you buy the new server now go for domain control panel and put there DigitalOcean Server Name Servers and point server with Domain. For changing name server you need to follow following steps for GoDaddy Users.
- Select the domain names you want to modify.
- From the Nameservers menu, select Set Nameservers.
- Under Setup type, select Custom.
- Click Enter custom nameservers.

- Enter the custom nameservers your hosting provider gave you and click OK.
For the DigitalOcean Name Server, You can put below Name Server for point your Domain with Server.
- ns1.digitalocean.com
- ns2.digitalocean.com
- ns3.digitalocean.com
For More Information You can also visit GoDaddy Customer Support by Click Here.
How to Deploy Server on DigitalOcean ?
First things you need to buy a particular domain or without domain also you can deploy server after that configure or point to the domain. Here is the image for deploying server easily Just signup choose plan and go, Simple. For more visit above link, I also put there to how to deploy server easily or see below image.
I recommended deploying Ubuntu 14.XX Server in DigitalOcean Because It is Easy to Configure in Server Avatar.
Finally, You create droplet on DigitalOcean Now you have a number of servers in your account Right!! Here I put the image which shows the server list which is created on your account. There is in the table format like Name, IP Address, Created Address and More Things.
When you create droplet at Final end you will get Message in registered email which contain Information regarding your server like which OS, Your Dedicated IP, UserName, Password etc.
How to Add Domain in DigitalOcean ?
After Creating or Deploying Now We move to forward to Add Domain in Our Server Because when you add domain after that server connects with the domain without this step server not connect with the domain.
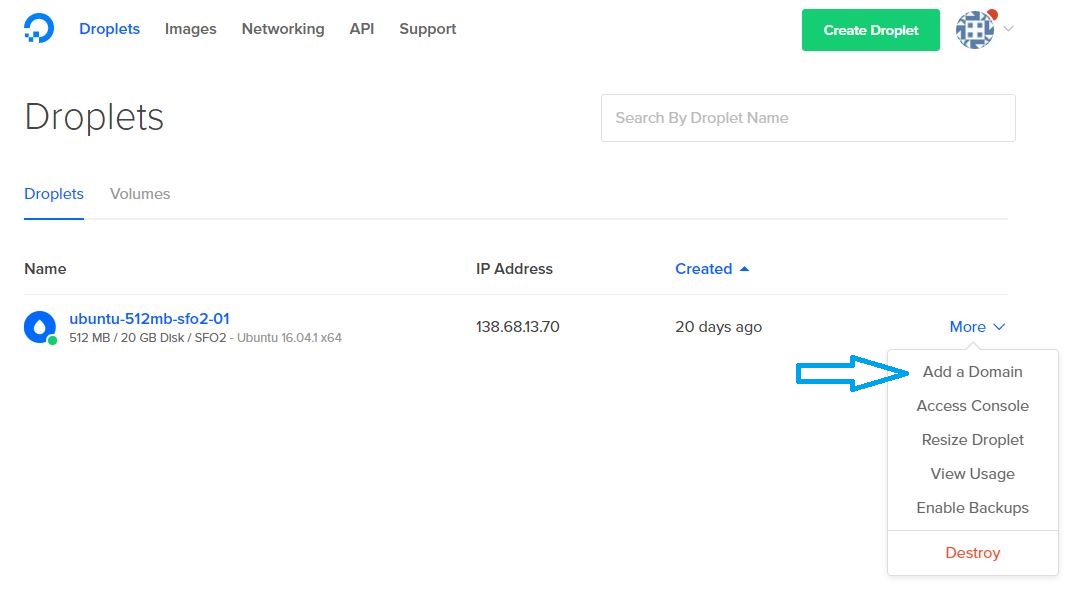
In DigitalOcean Account Panel in Server List, there is right side a Button of ” More ” click on a list Open one Dropdown and Then Select ” Add a Domain “. See Following Image.
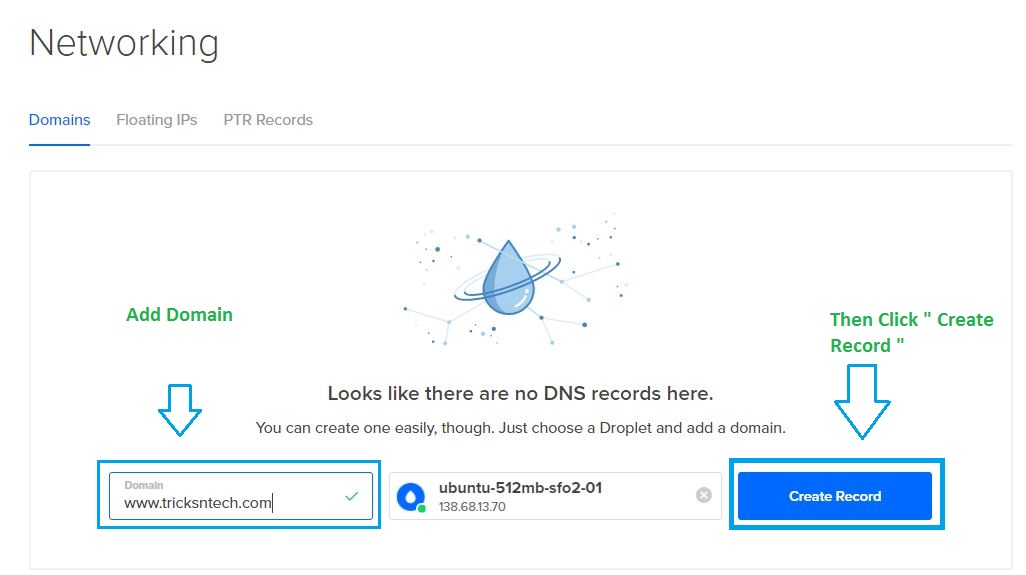
After Click on “Add a Domain” New Window will Open. Add your Domain there and click on ” Create Record”.
How to Connect DigitalOcean with Server Avatar ?
Now move to main part for connecting DigitalOcean Servers with server avatar. Here is the steps for connecting DigitalOcean server with Server Avatar.
Step 1: Click Here to Login on Server Avatar.
Step 2: After Login in the Dashboard there is a link to “Add Server” . Click on It.
Step 3: After Clicking on “Add Server” Put your server IP and Root Password in Dialogue Box and Click on ” Add Server”. It takes some time to add a server in Server Avatar so Be patient and Wait for some time.
Note : Server IP and Root Password you will get in the email when you deploy the new server from DigitalOcean.
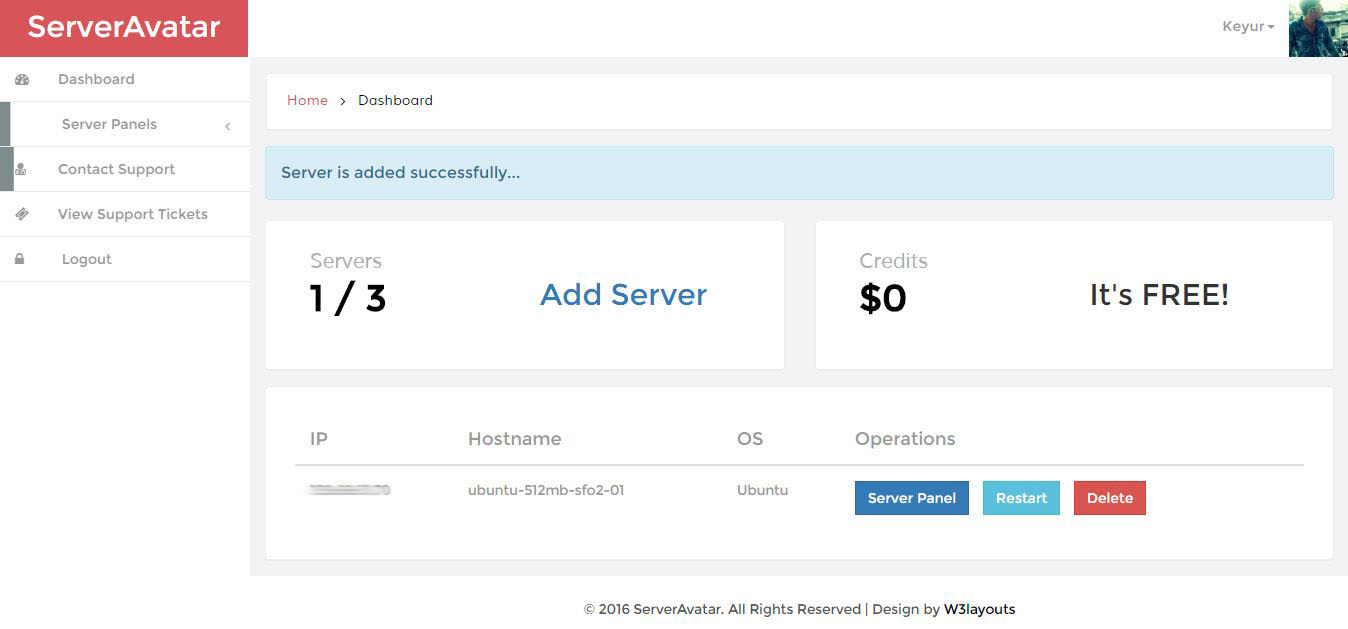
Step 4: After a Some Time You will get Message “Serer is added Successfully” on Dashboard.
How to Manage, Setting Your Site or Blog With Server Avatar ?
First I ask you have completed all the task which are mention above. after that, you have access to doing all these steps. now Move Forward.
Step 5: Now Click on “Server Panel” which showing on Dashboard.
Step 6: Yipeee!!! After You came to the world of managing to do anything or configure the server.
How to Add Site on Server Using Server Avatar ?
Step 1: First in Server Panel Click on ” Add Site ” and Fill Up The Details.
Step 2: After you will get Message ” Site has been Deployed Successfully… ” on Dashboard. Now we are moving forward.
How to Install WordPress on Server Using Server Avatar ?
Step 1: First in Server Panel Click on ” Install WordPress ” and Fill Up The Details.
Note: Before Installing WordPress, Don’t forget to Add site to your server…
Step 2: Yipeee…!!! You installed WordPress now go for Homepage : www.yourdomain.com For WordPress Admin Panel : www.yourdomain.com/wp-admin
How to Install PhpMyAdmin on Server Using Server Avatar ?
Step 1: First Go To Server Panel and Click on “PhpMyAdmin” and Then Click on ” install PhpMyAdmin”.
Step 2: After Clicking on It wait for a few seconds Now Note Down User Name and Password and Click on Launch “PhpMyAdmin” enter this Username and Password.
Step 3: After Launch and Enter Username Password Yipeee…!! you will get PhpMyAdmin on Screen and Access it Easily.
How to Add Database in Server Using Server Avatar ?
Step 1: First Go To Server Panel and Click on “Add Database” and Then enter “Database Name” in the field. Then click on ” Add Database to Server”.
Step 2: After That, you will get message ” Database was created successfully…”.
For See Database is Created or Not Go To http://www.yourdomain.com/phpmyadmin See there is left side Database name is present in the list.
Before Show, this PhpMyAdmin is installed on your server.
Comparison Server Avatar V/s Server Pilot
Server Avatar | Server Pilot |
| New in Market | Old in Market |
| Https, Secure and Trustful | Https, Secure and Trustful |
| Reliable & Easy to Implement | Reliable & Easy to Implement |
| Free | Paid |
| Unlimited Website | Unlimited Website |
| Limited Servers | Limited Servers |
| Support DigitalOcean | Support DigitalOcean |
| Support Linode & Other Server Also | Support Linode & Other Server Also |
| Cheap Backup | Costly Backup |
Final Conclusion
At the Reach of Final Stage, I say that you will go with Server Avatar because without paid nothing You will install WordPress, PhpMyAdmin, Add Database, and more task. Server Avatar Real-time Manage lots of Servers without any interruption. Server Avatar whole Credits goes to a Professional Developer Adarsh Sojitra who make it for easily manage the server. Tricks N Tech Heartly Thanks to Aadarsh Sojitra to Make Awesome Portal For People.
If You Have Any Problem Regarding This Then Feel Free To Comment Here.


Thanks maan !! I was fade up with serverpilot. Serveravatar is much easier than serverpilot. I can easily add ssl certificate here.
Once again thank you very much.