Android came, it saw, and then conquered 80% of the smartphone industry. Some may term this a “very bold proclamation” but the recent statistics back up our statement in entirety. Agility, highly improved usability, and swiftness are the contributing factors behind the popularity of Android OS.
Since the user base of Android OS is increasing on daily basis, so are the number of complaints. Many Android users seem to be worried about their contacts being lost or deleted accidentally in the result of any swift action.The contact list is one of the most private areas & nobody would want to keep its backups on multiple platforms because it seems impractical. In order to get you out of this jeopardy, we are about to explain a very simple process to recover deleted contacts from Android devices.
Contents
- 1 What Happens When a Contact is Deleted?
- 2 Introducing Dr.Fone: Your Only Choice for All Accidental Delete Troubles!
- 3 Step-By-Step User Guide to Recover Deleted Contacts from Android Phone:
- 3.1 Things to gather first:
- 3.2 Step – 1: Enable USB Debugging on Your Android Device
- 3.3 Step – 2: Download, Install and Launch Dr.Fone
- 3.4 Step – 3: Choose Recovery Option
- 3.5 Step – 4: Select Your Desired Type of Recoverable Data
- 3.6 Step – 5: Choose the Scan Mode
- 3.7 Step – 6: Your Recovery Files are Ready!
- 4 Final Word
What Happens When a Contact is Deleted?
Before moving towards explaining the process of contacts recovery, we want you to understand this. Whenever you delete something from your android phone, it is never deleted permanently. There is always a chance of recovery if the recovery process is implemented properly.
Same is the case with contacts. If you have lost a contact accidentally, no need to worry. All you should do is to stop doing anything you are doing and follow the recovery procedure from our next section.
Introducing Dr.Fone: Your Only Choice for All Accidental Delete Troubles!
Users have no idea about how to tweak or tinker the inner functionalities of an android phone. Recovering the lost contacts may not be easier for you if you plan to do it on your own. To ease your troubles, we have brought you Dr.Fone, an effective and reliable data recovery tool.
Dr.Fone is one of its kinds type of a user assistance software which has been developed to aid the customers in recovering lost data. Unlike other tools, Dr.Fone works for both iOS and Android plus it is equipped with recovering not only just the contacts, but also it is capable of:
- Fixing SD-Card issues.
- Solving rooting problems.
- Resolving reset errors.
- Providing solutions for corrupt updates, malware and so much more.
Prior to proceeding any further, you need to download Dr.Fone, install it and move on to the next section right after.
Step-By-Step User Guide to Recover Deleted Contacts from Android Phone:
Things to gather first:
- A good quality connecting cable for Android.
- A fully functional computer/laptop, plugged-in to a power source.
- Fone recovery software installed and running.
Step – 1: Enable USB Debugging on Your Android Device
Start your computer and connect with it your Android smartphone using the connecting cable, also known as the USB cable. Make sure to enable USB debugging on your Android device.
How to Enable USB Debugging on Android?
- Android 3.0 to 4.1:
- Go to Settings.
- Tap on Applications.
- Again tap on Development and tick the box near to USB debugging.
- Android 4.2 or Later:
Just tap on Settings option, scroll down till the end and there you will see USB Debugging option, just tick the box and you are all set.
Step – 2: Download, Install and Launch Dr.Fone
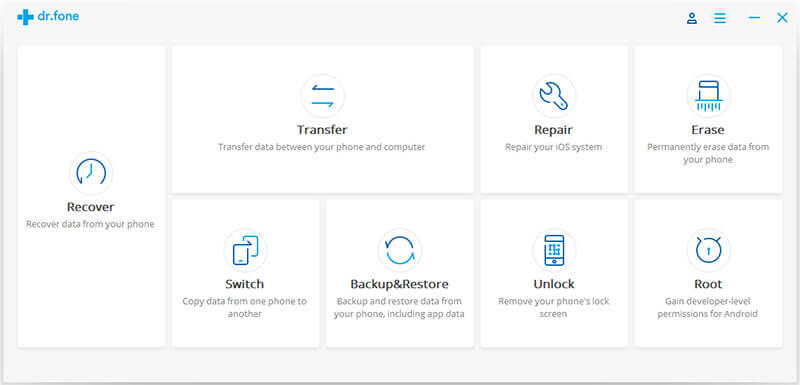
Launch Dr.Fone on your computer. After a few seconds, you will see the following screen:
Step – 3: Choose Recovery Option
Click on the “Recover” option from the above screen and while you do this, don’t forget to tap “OK” on your device to allow USB debugging.
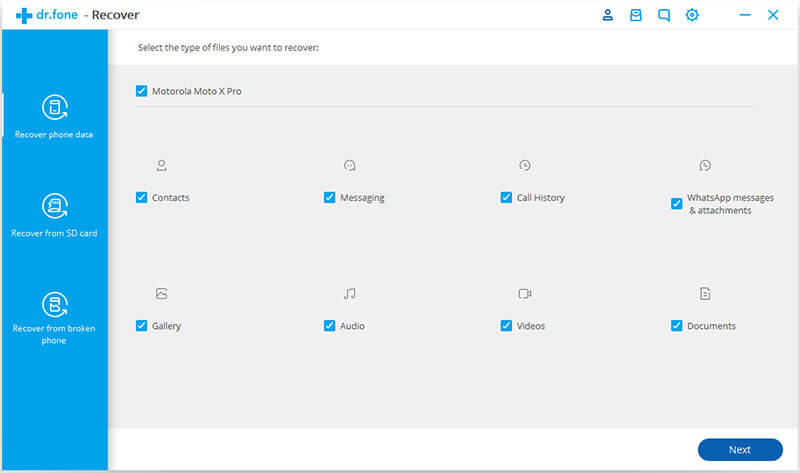
Step – 4: Select Your Desired Type of Recoverable Data
You will see a whole new screen where Dr.Fone will list out all the types of recoverable data. You can choose from a variety of data types like:
- Messaging
- Call history
- Whatsapp messages
- Images and videos
- Documents
- Contacts
Since the subject of our today’s article is to recover deleted contacts from Android device, we will be choosing all of the types but our main focus will be on “Contacts”.
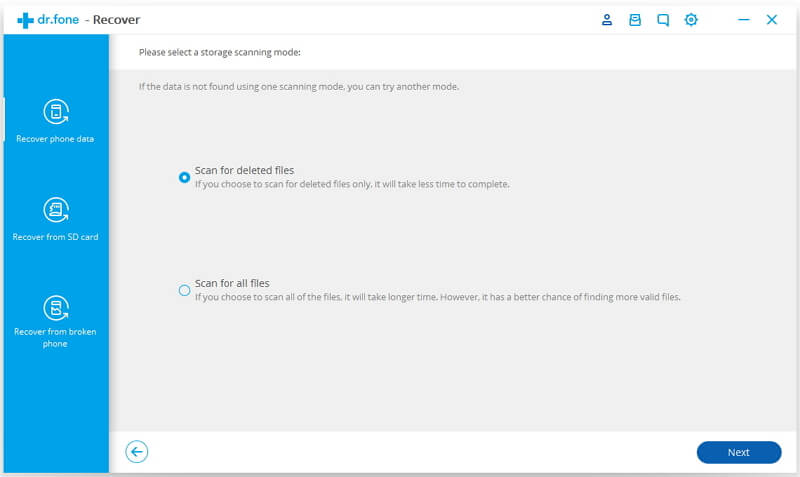
Step – 5: Choose the Scan Mode
Select the appropriate scanning mode from the two options which are:
- Scan for Deleted Files.
- Scan for All Files.
The second option may take much time because no one knows how much the deleted will be in total. So, we are going to select the first option.
Click on the “Next” button and let the Dr.Fone do the digging. Make sure not to disconnect your device from the computer because it will abort the whole recovery process. In addition, be patient because the scanning duration totally depends on the storage capacity of your Android device. So, let the scan complete.
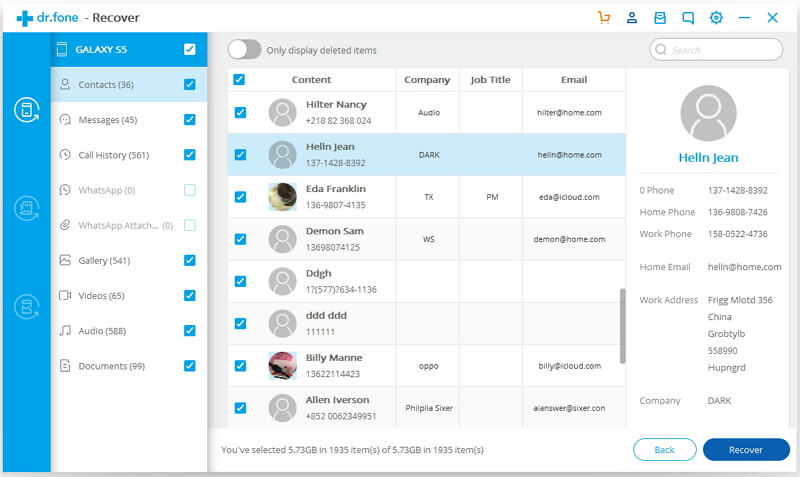
Step – 6: Your Recovery Files are Ready!
Once the scan is complete, Dr.Fone will list out the “found data” for you. In this case, since we need only contacts to recover, we’ll only choose the “contacts” and will download a copy in our computer.
Final Word
By now, Dr.Fone has managed to garner tremendous clientele due to its robust technology. It is the best tool to recover deleted contacts from Android phones. No matter whether you want to recover the data in bulk or just a couple of images, Dr.Fone will take care of it by diving in deep and bring out whatever you need which you accidentally deleted. So, say goodbye to all your recovery troubles and start getting back your deleted content without any difficulty.


Thanks for sharing this information.
Thanks Rachit, its helpful
Thanks Rachit for this article.